Left Terugkeren naar winkel
Besteloverzicht

Je winkelwagen is leeg

2025 Spider Farmer GGS AC5 5-way multi-socket for climate control in grow tents– with temperature, humidity and VPD measurement, time control, historical data, Bluetooth & WLAN

€85,99 EUR €129,99 EUR

Subscribe for up to 10% coupon!

Discreet packaging & no customs.

✔Need 3pcs or more, Email us for a better deal.

✔No credit/debit card? Email us for IBAN to make a SEPA or Bitcoin payment.


Payment Guide

We accept credit/debit cards, bank transfers, and bitcoin for payment


When you pay with a credit or debit card, you can place your order directly online.

If you want to pay via bank transfer or bitcoin, please email us at info@fastgrowstore.eu, and we will send you an invoice with our Bitcoin wallet address or bank account information for payment and offer you extra discount.

Below is a list of our bank details:

Account name: Fast Grow Store Daily Necessities Company
IBAN: DE73202208000030075064
Bank name: Banking Circle S.A. –German Branch
Swift/BIC code: SXPYDEHH
Type of account: Business Account
Warranty & Return

We pride ourselves in offering the highest quality products from the best manufacturers on the market. If there is ever a problem with your products please reach out to info@fastgrowstore.eu with the following information:

  1. Your Order Number
  2. Your Shipping Address
  3. A Brief Description of the Issue
  4. Photos may also be needed – see manufacturer warranty details below.
Click the following "brand name" to check brand specific Warranty & Return details:
Shipping Cost & Power Cord

Order Shipment:

We can ship to  all European Union countries, Norway and Switzerland with standard 220V EU plug. 

A small amount of shipping fee around €10 per item will be charged when we ship to these countries:

Germany, Spain, Netherland, Portugal, Poland, Estonia, Ireland, Sweden, Lithuania, Finland, Slovenia, Slovakia, Belgium , France, Greece, Italy, Czech Republic.

Shipping to Norway,Switzerland and Malta will incur higher shipping costs. You can view the final shipping fee at checkout after entering your delivery address.

Most products ship within 1 to 2 business days from the date of your order. We will send you tracking information as soon as it is available. If 5 days has gone by and you do not have tracking information yet, please reach out to us.

Cancel Order:
You have the option to cancel your order before it is shipped.

If you cancel an order after it has been shipped, you will be charged the shipping cost. Depending on the return policy of the supplier, a restocking fee may be charged.

If you pay with a credit or debit card or Bitcoin and cancel your order for own reasons, we will charge you 3% in handling fees. If you make the payment by bank transfer, you will be charged a handling fee of €10We can accommodate most requests, but due to the different time zones and schedules that our warehouses ship from, sometimes the cancellation request may not reach the warehouse in time before the product ships. Once the item has been arranged to ship or has shipped, the package will be treated like a 'return' and is subject to ship-back fees and restocking fees.

Partial Shipment Policy

If your order contains multiple items and some are out of stock, we will ship the available products first. Once the new stock arrives, we will promptly ship the remaining items.

Customers can cancel the out-of-stock items before shipment, and a full refund will be issued for those items. However, if you wish to cancel items that have already been shipped, the products must be returned to the sender. A refund will only be processed once the return is received and confirmed. In such cases, the customer will be responsible for the return shipping costs and a restocking fee, which will be based on the official brand supplier pricing.

If you have any questions or would like to check the availability of an item, you may email us here or send email to info@fastgrowstore.eu, we will reply within 24 business hours.

Thank you for shopping with us.

Best Price & Money Security Guaranty

We have the best prices on the internet. If you find another online store with a lower price than us within 7 days of your purchase date, please notify us and we will refund the difference.

You may shop with confidence at our store. If you want to validate our authenticity, please email our representative from the official brands.
Mars Hydro:bruce@mars-hydro.com
Spider Farmer: judy@spider-farmer.com
G-tools:sales@g-tools.nl
Migro:info@migrolight.com
Fluence:service@luxlight.de

Smart Controls Outlets:
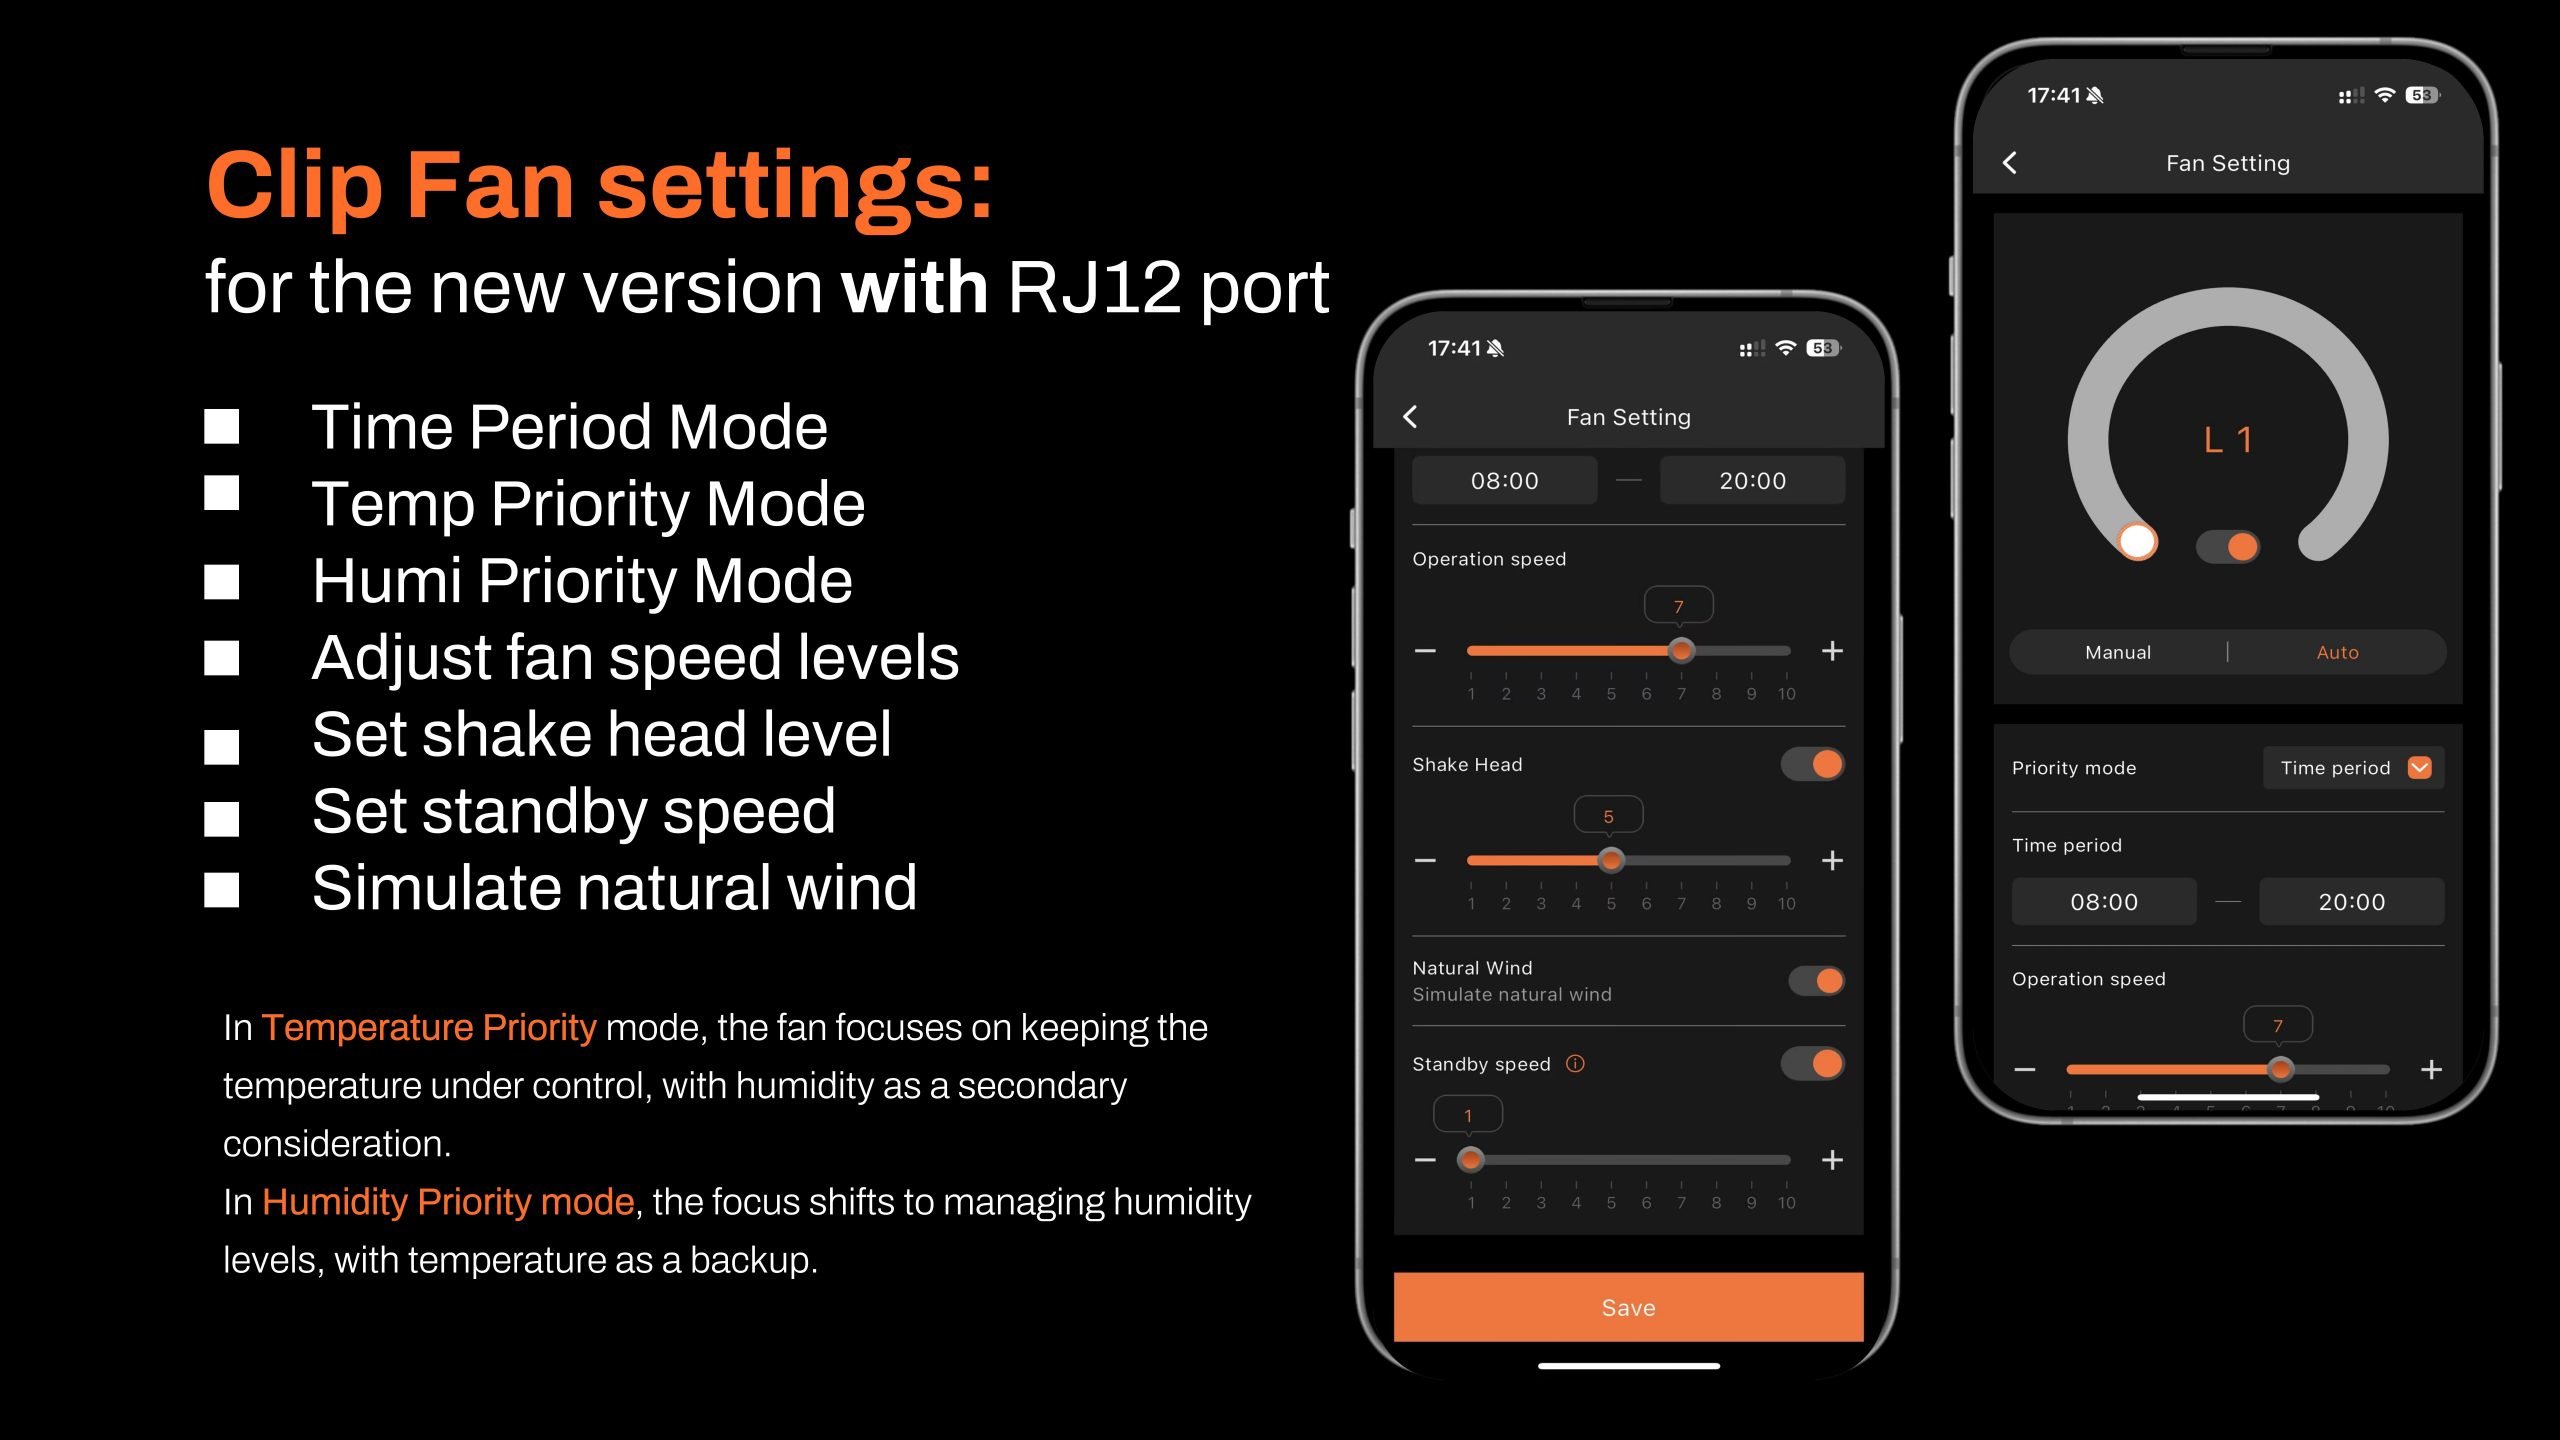
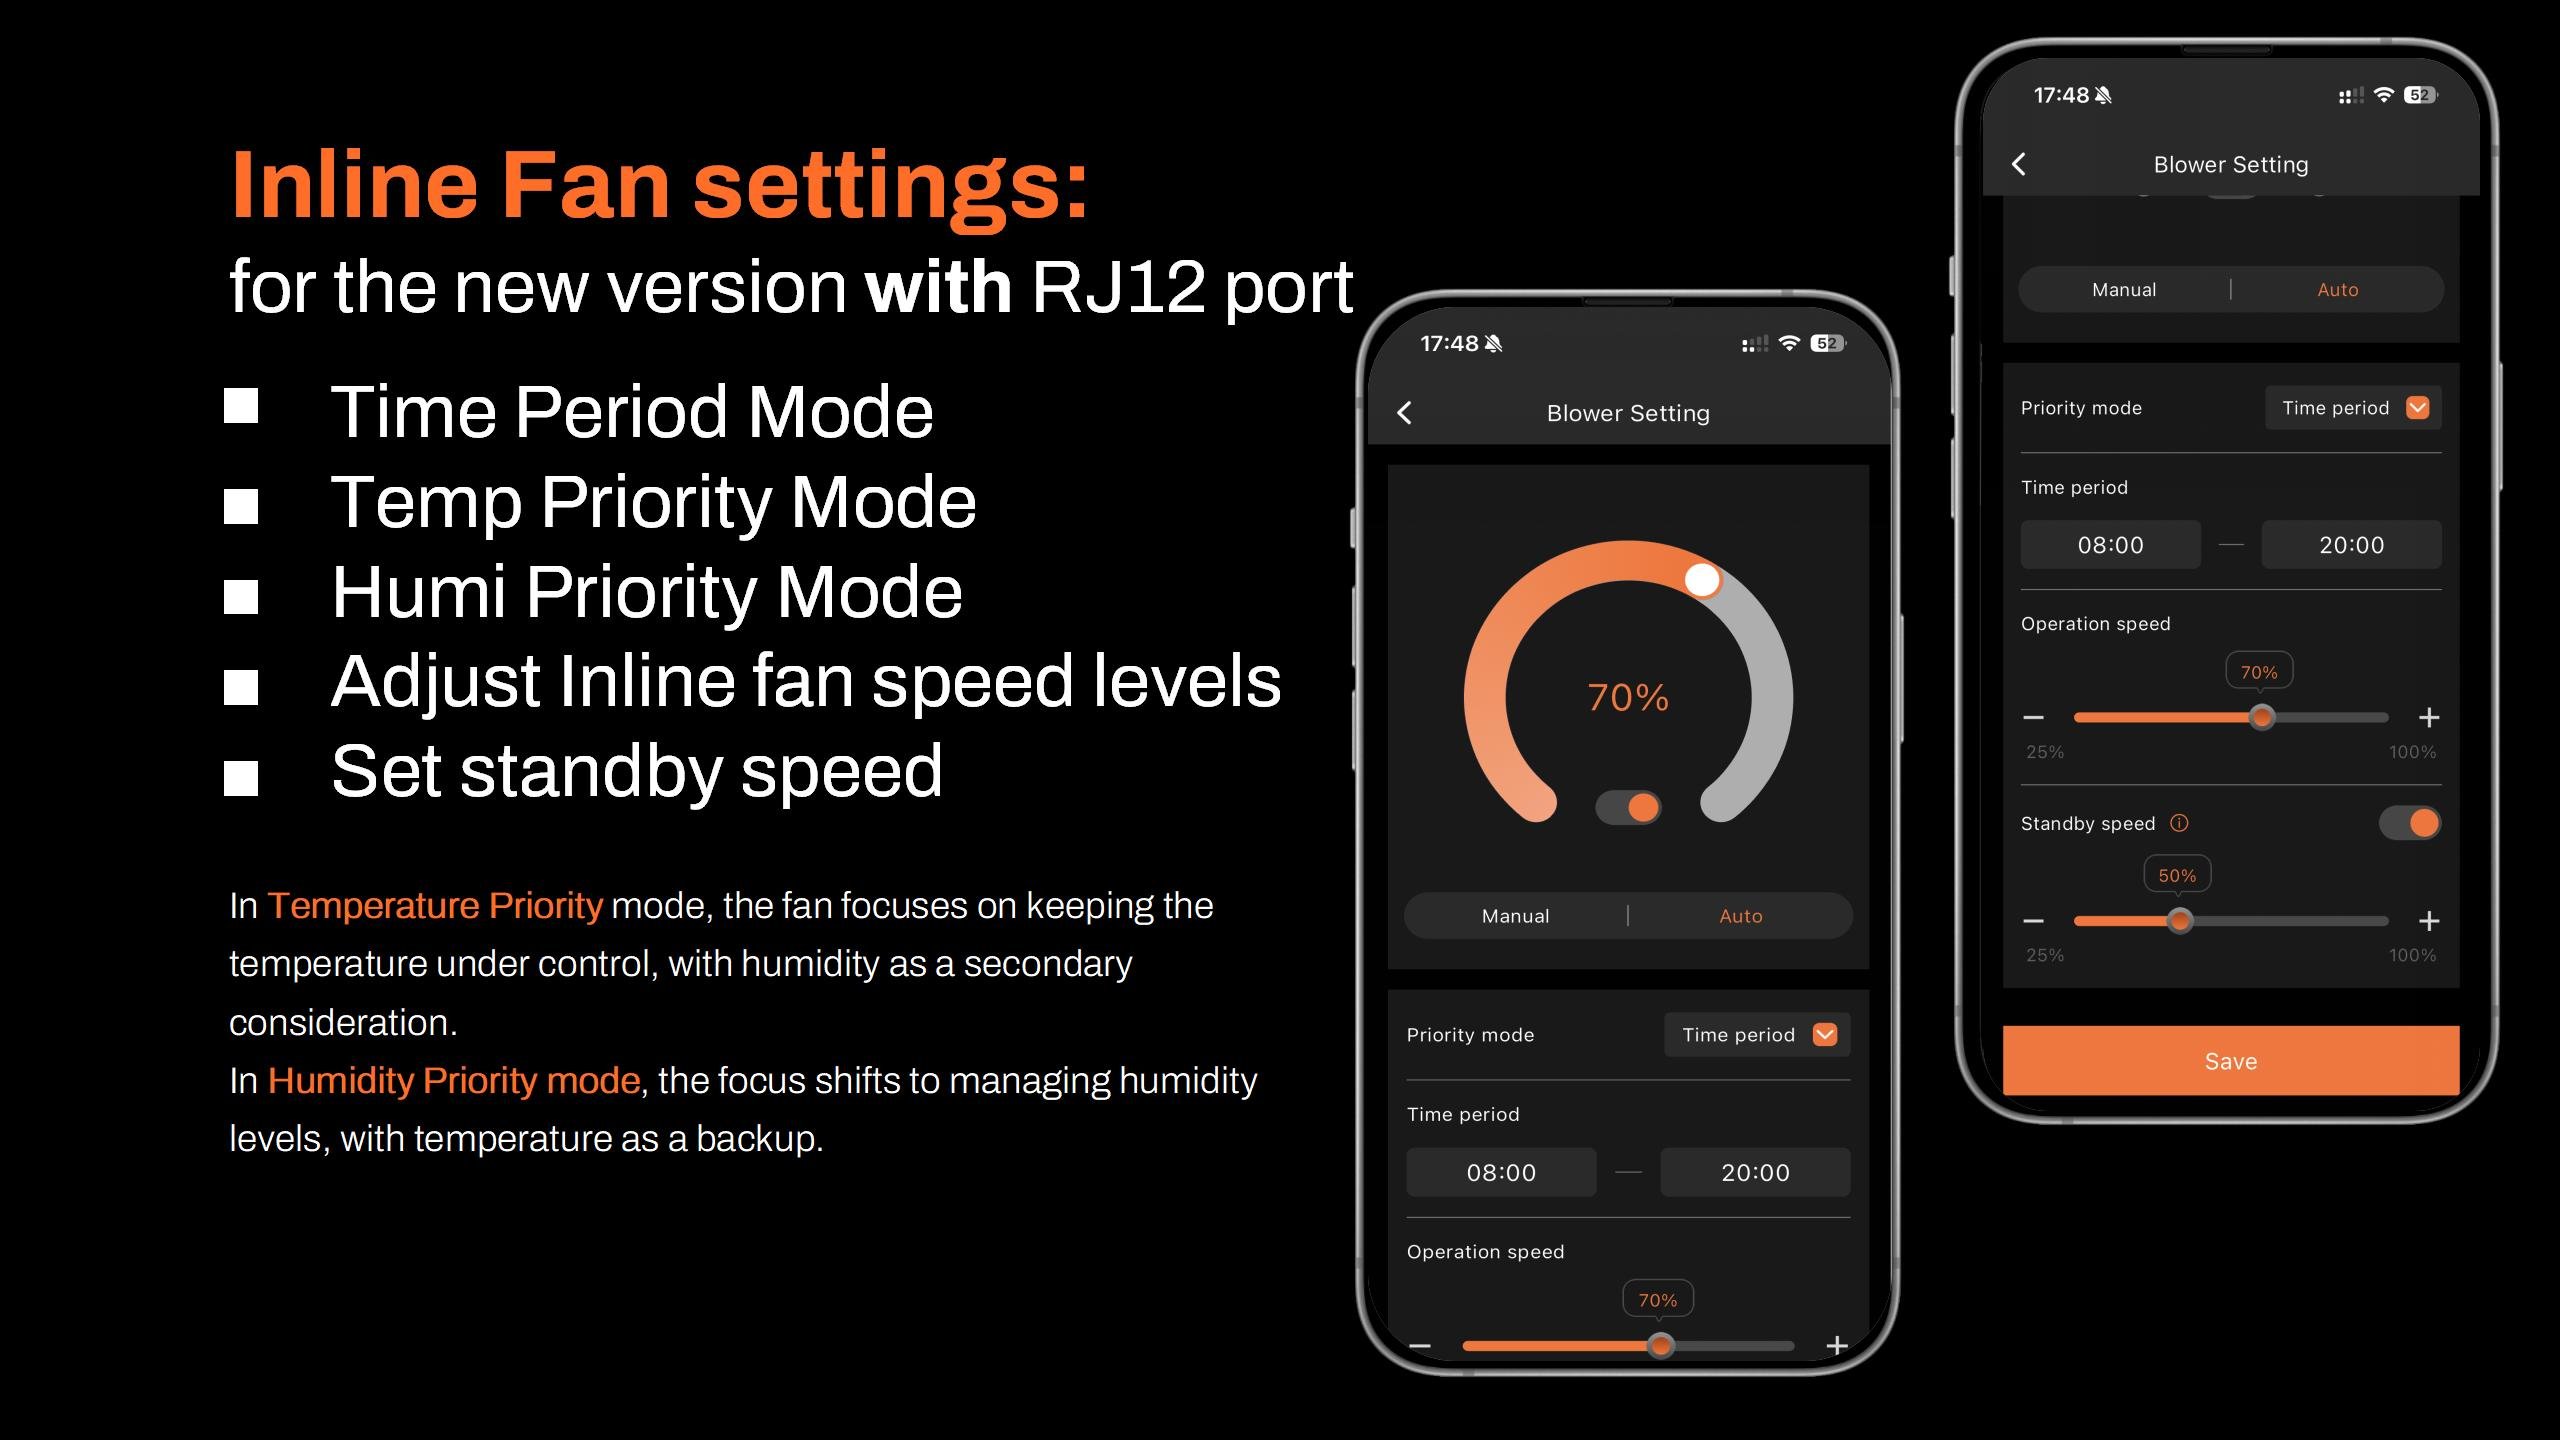
The GGS AC5 power strip features 5 independent outlets, allowing you to power and control up to 5 devices. With the Spider Farmer app, you can remotely manage SF Series (excluding SF1000D, SF300, SF600), G Series, and SE Series LED grow lights. RJ12 clip/inline fans support precise scheduling, standby speed, and oscillation settings. Fans without RJ12 ports can still be controlled using on/off timers.

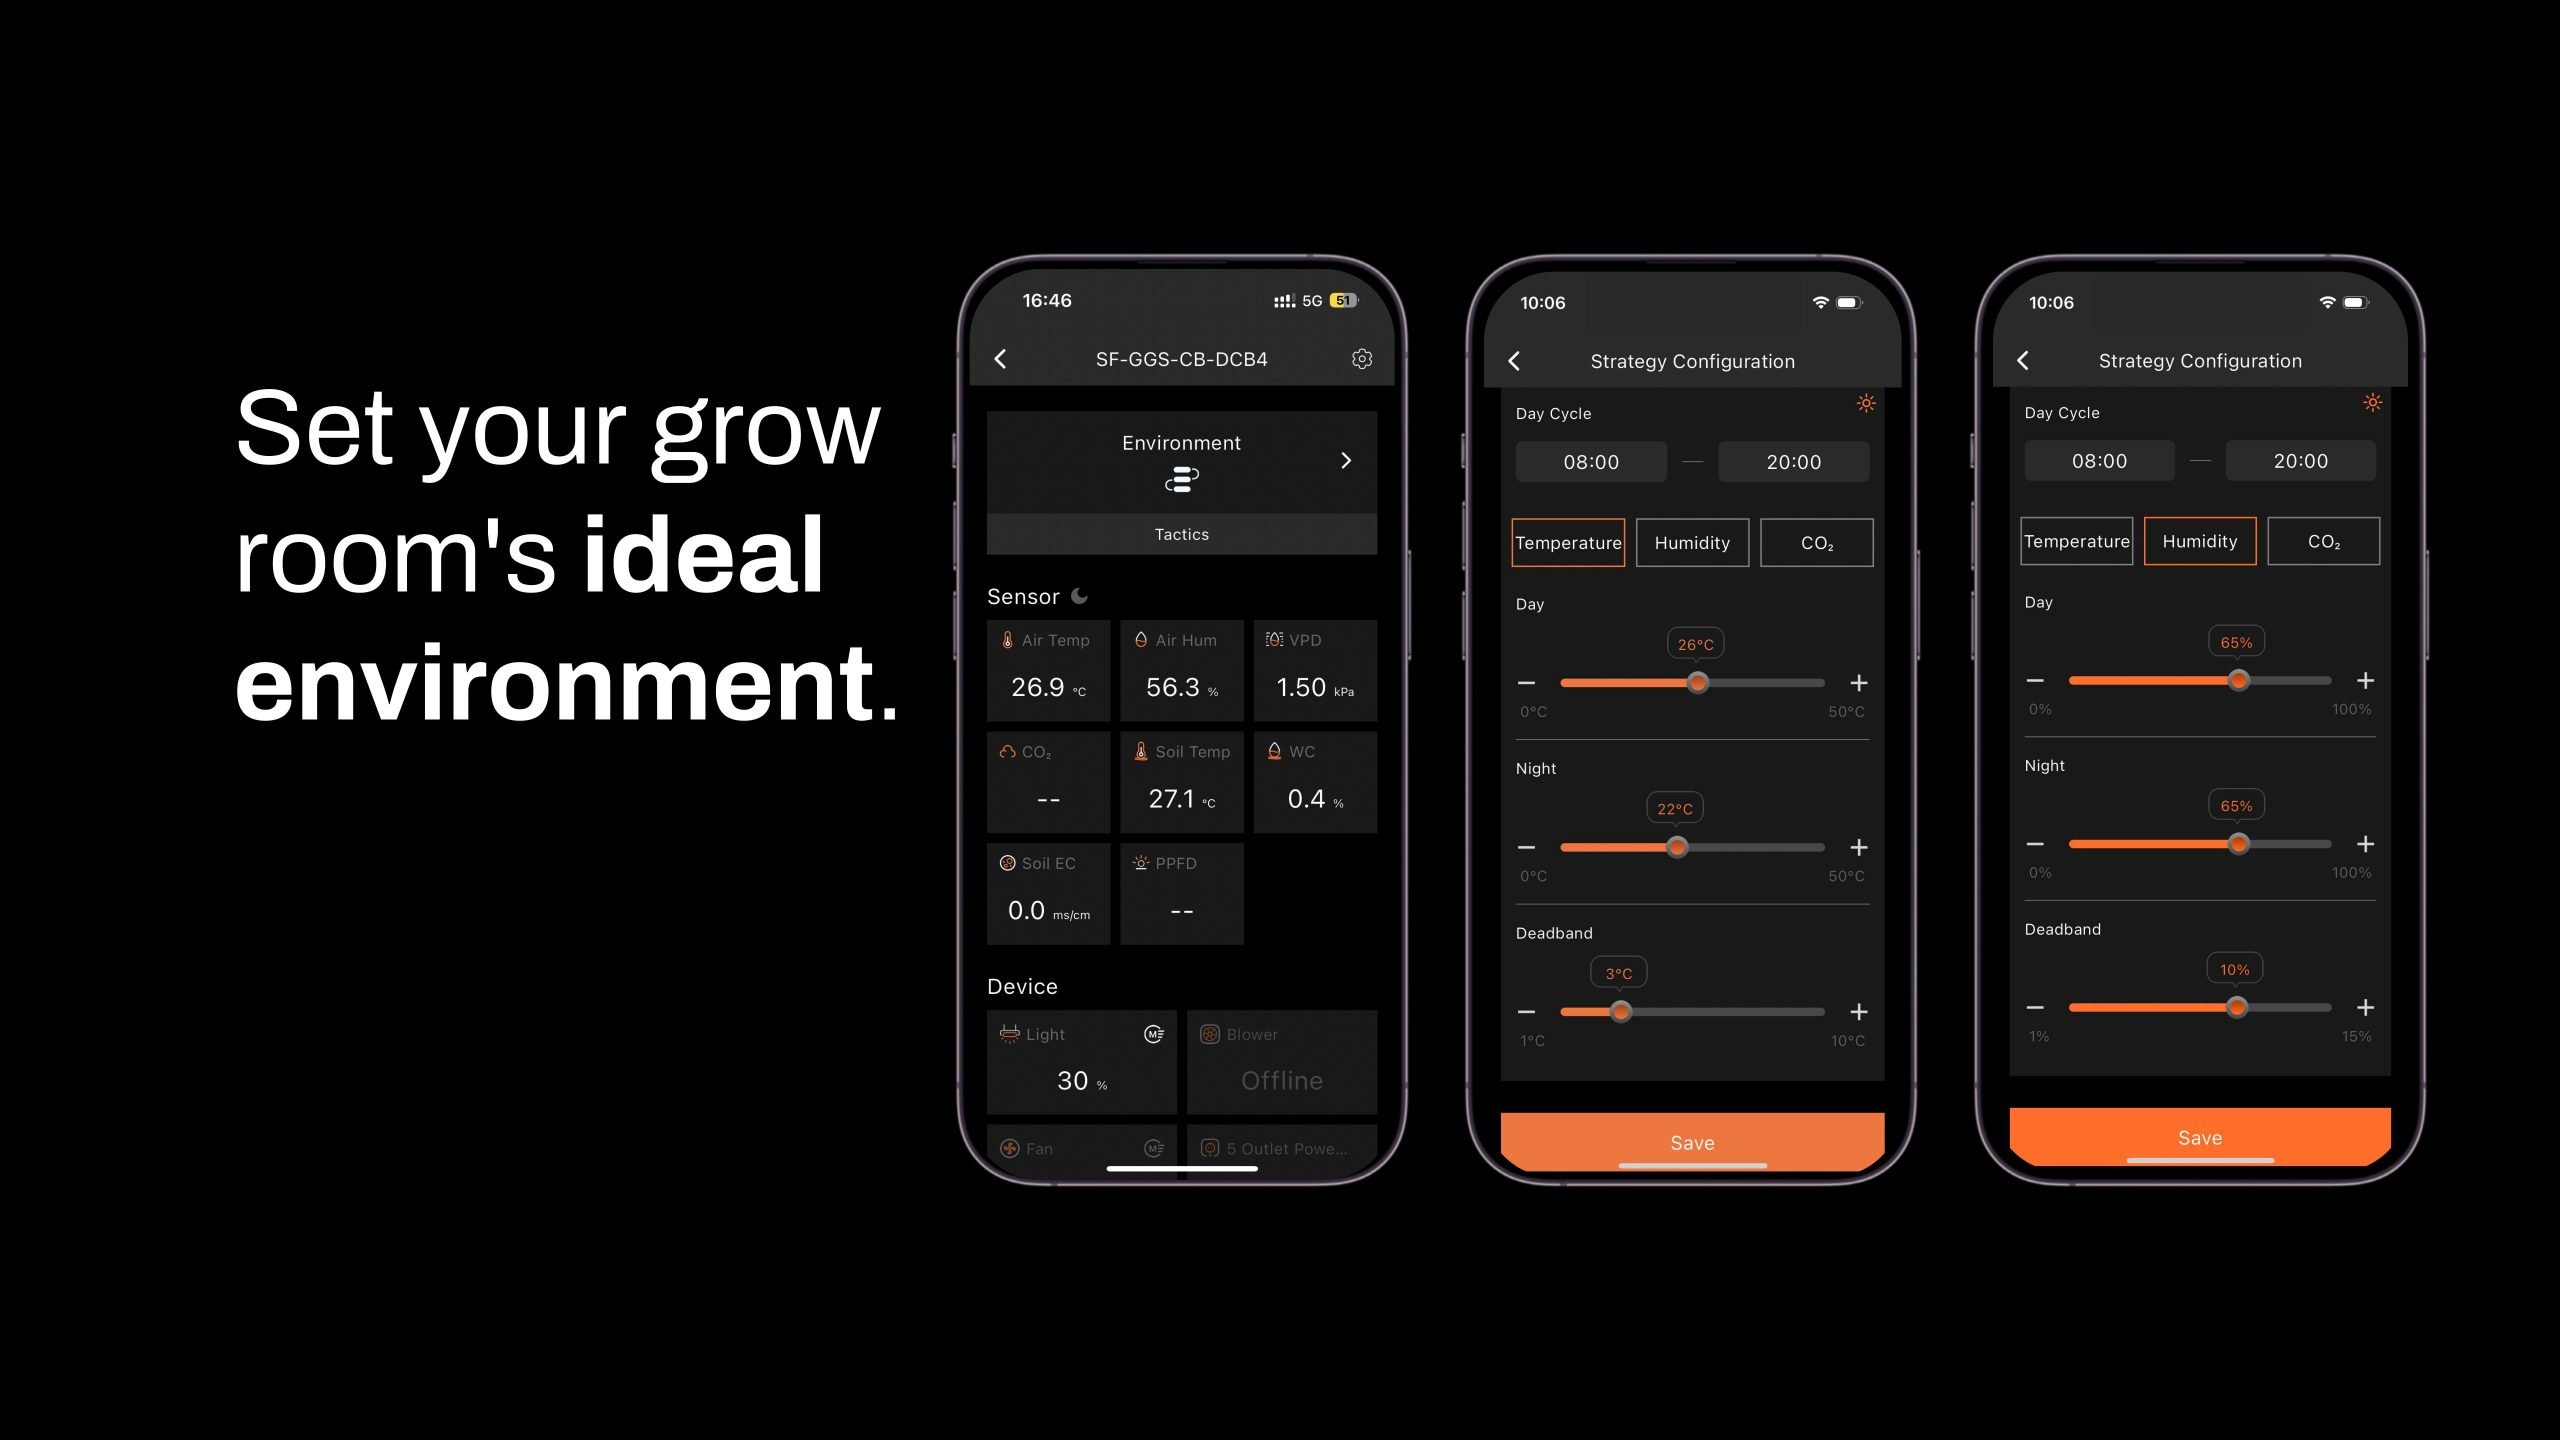
Comprehensive Environmental Control:
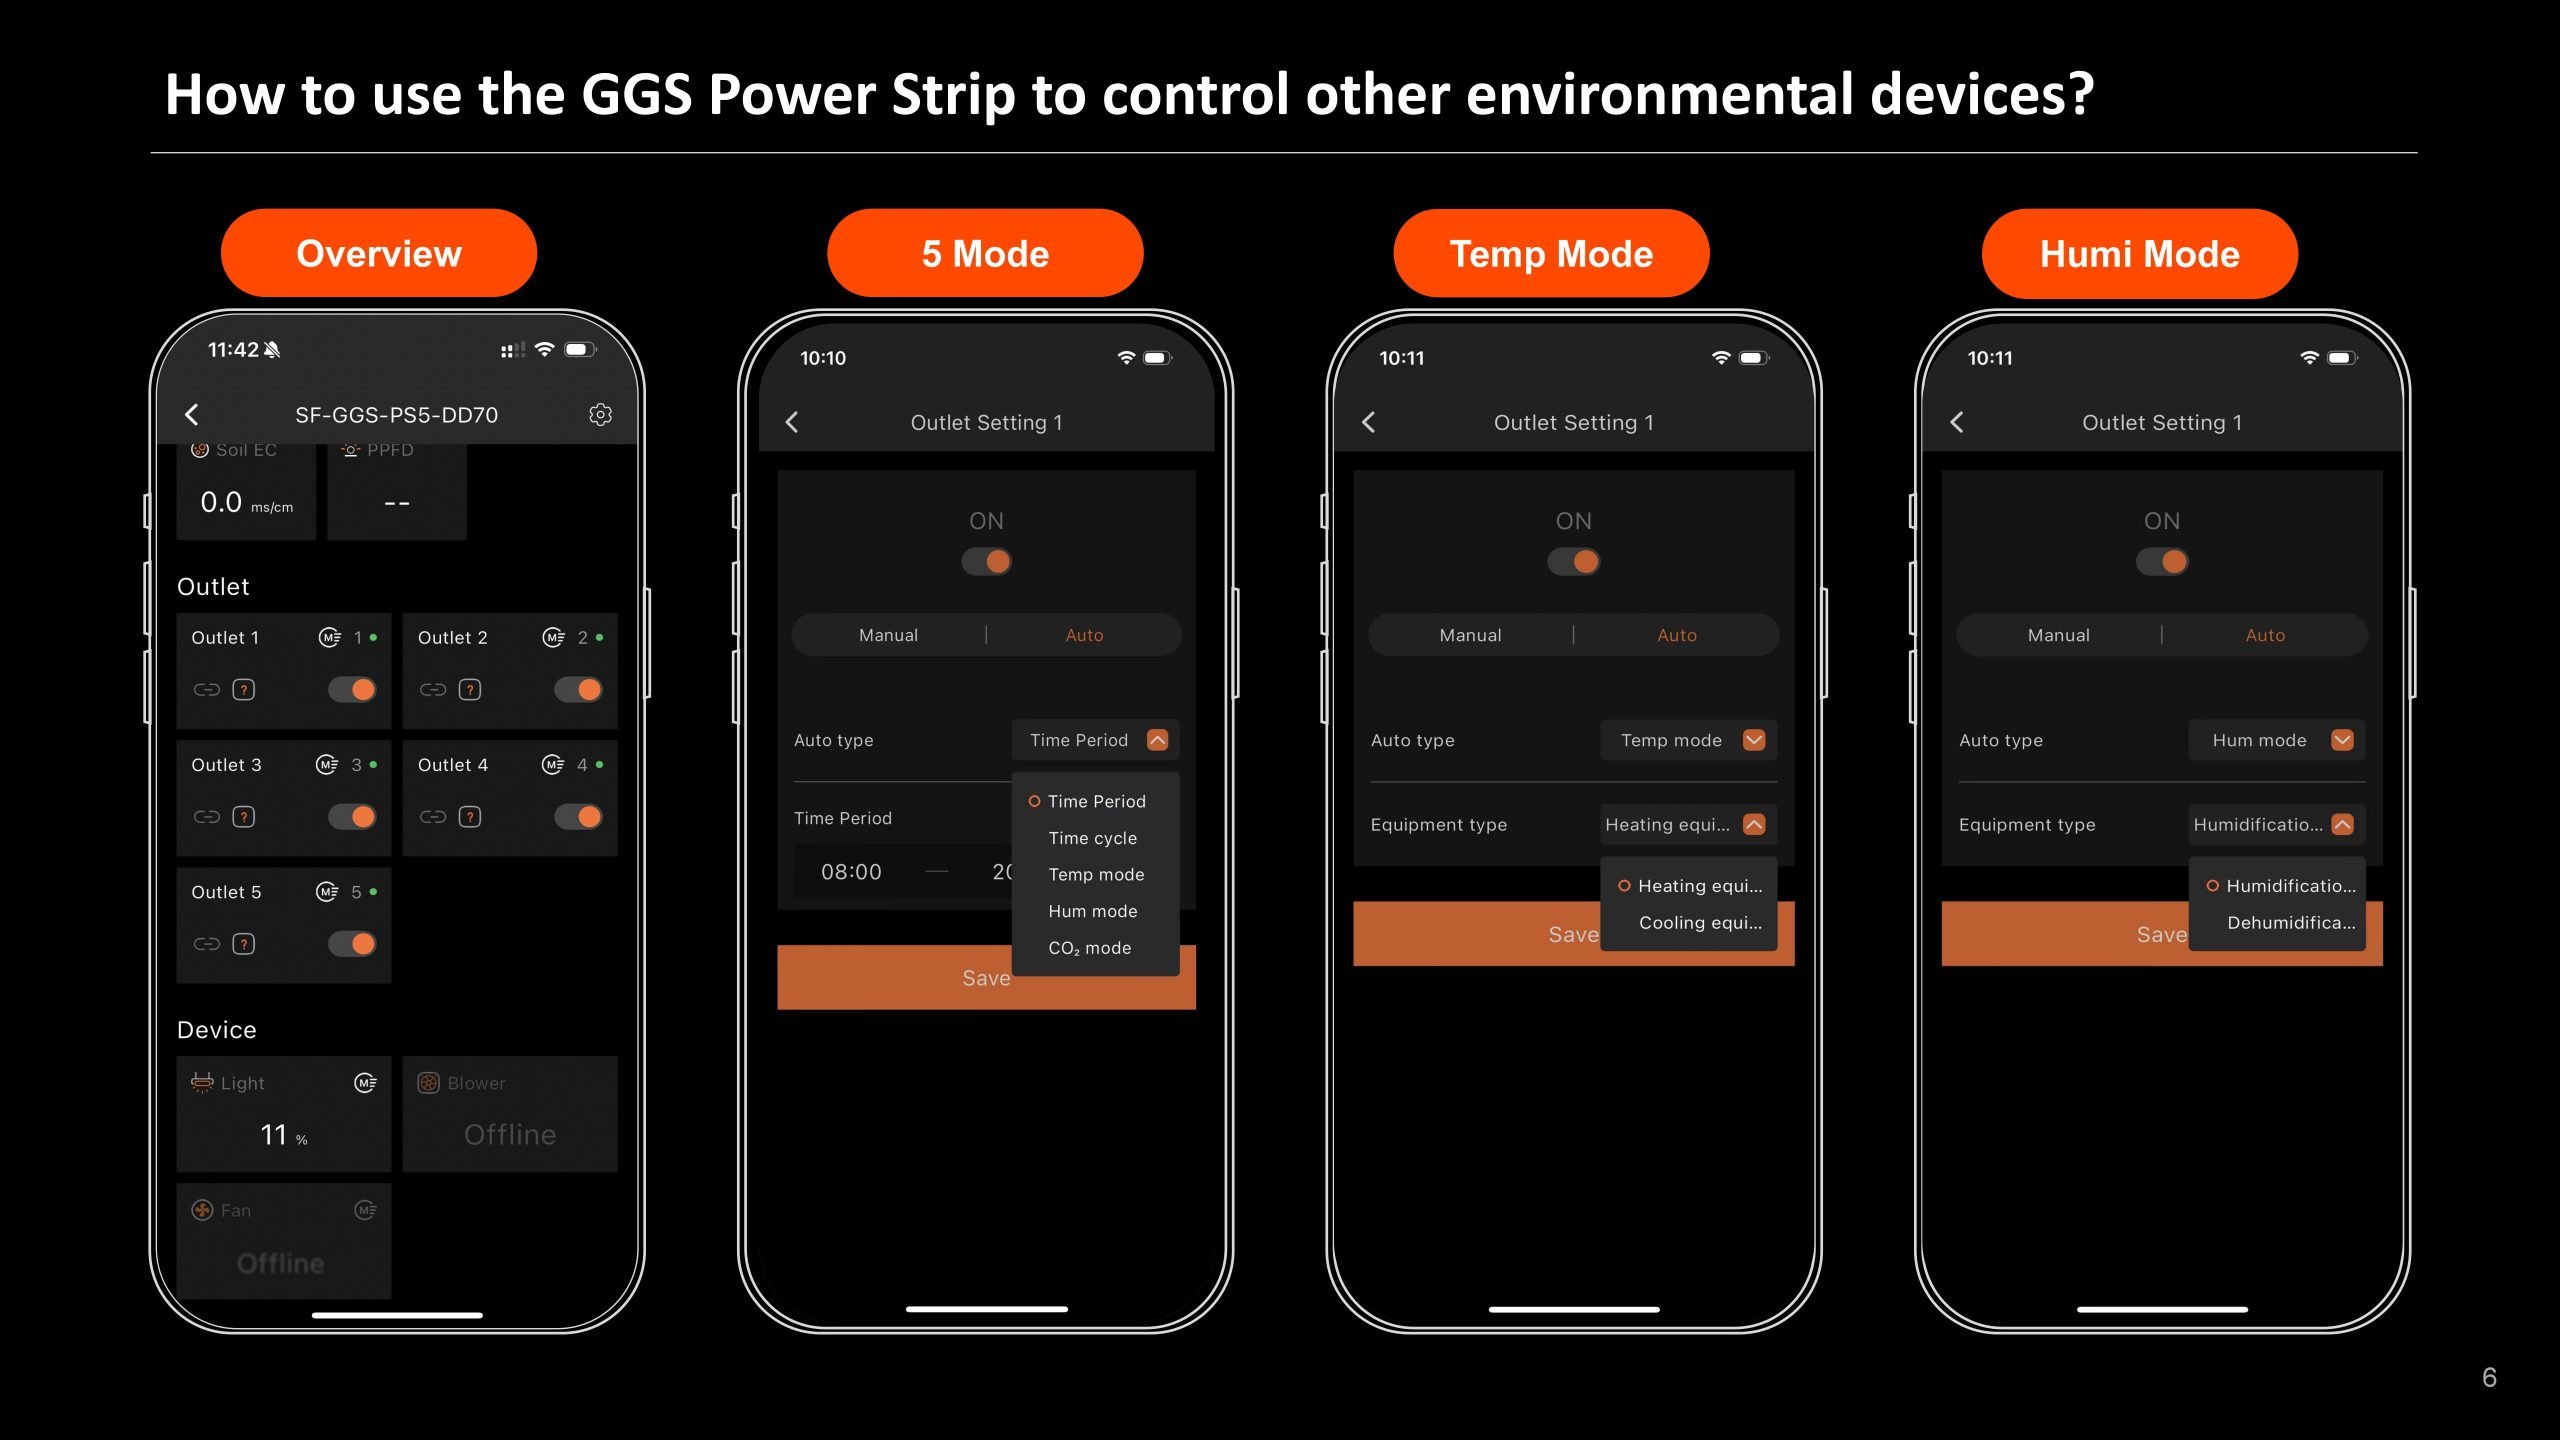
The GGS AC5 power strip kit works with heaters, humidifiers, dehumidifiers, and supplemental lights within the Spider Farmer ecosystem. It supports timer, temperature, humidity, and CO₂ modes, enabling automated operation for an optimized growing environment.
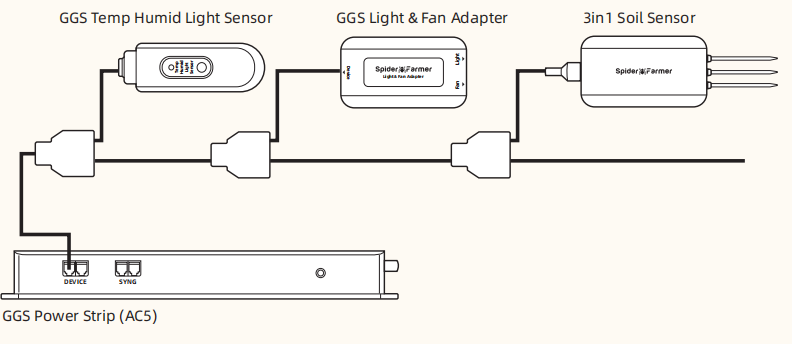
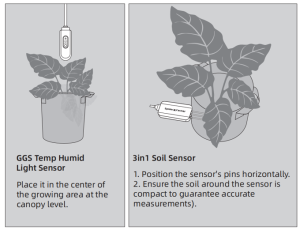
3-in-1 Soil Sensor:
This sensor monitors soil moisture (VWC), temperature, and electrical conductivity (EC), providing essential data for plant growth. It helps determine watering schedules, ensures healthy root development, and prevents over-fertilization. Insert the probes horizontally into the soil for accurate readings.

GGS Temp Humid Light Sensor:
This sensor tracks temperature, humidity, and day/night cycles inside the grow tent, optimizing plant conditions. Note: The light sensor is on the side—ensure it remains unobstructed for accurate measurements.

The kit includes:
1 x GGS AC5 Power Strip
1 x Temperature, humidity, and light sensor
1 x 3-in-1 soil sensor
1 x 2-in-1 adapter (for connecting the lights to the controller)
7 x 2.5m RJ12 cables (for connecting devices)
2 x 0.25m RJ12 cables (for connecting between telephone line splitters)
3 x RJ12 telephone line splitters (for expanding device connections)
6 x Hook and loop straps (for organizing cables)


Spider Farmer App Functions and Settings

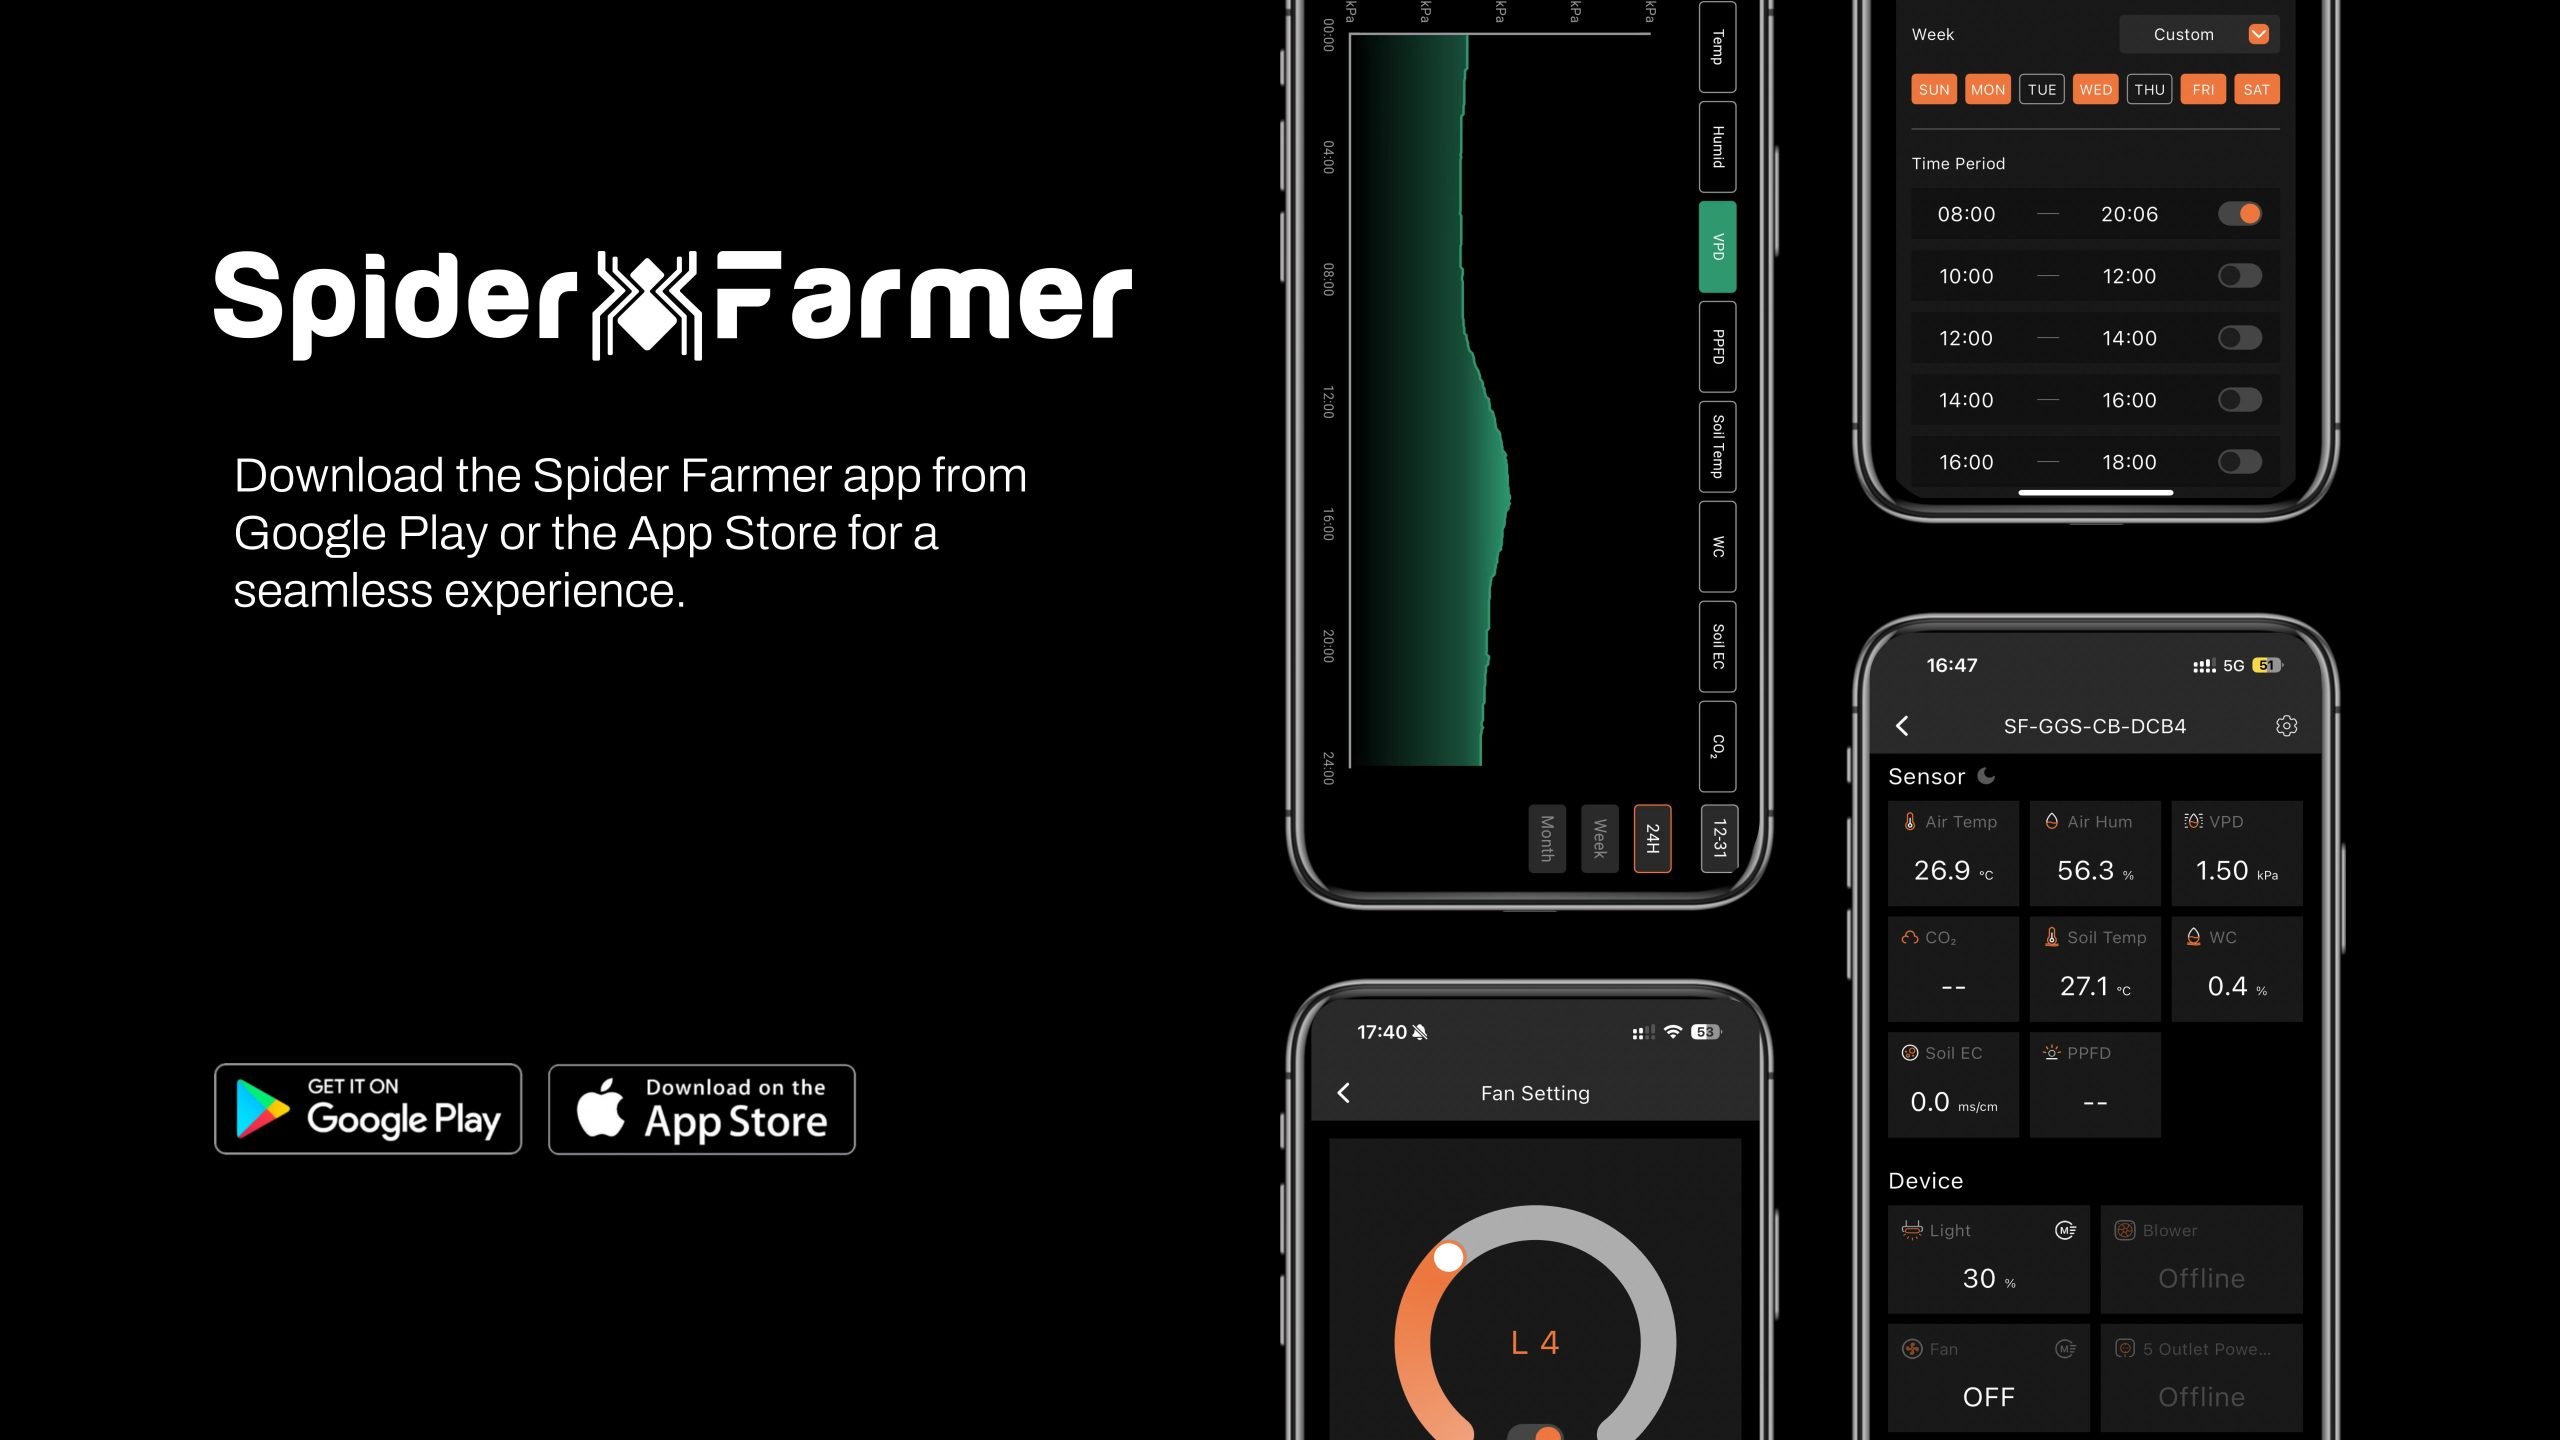
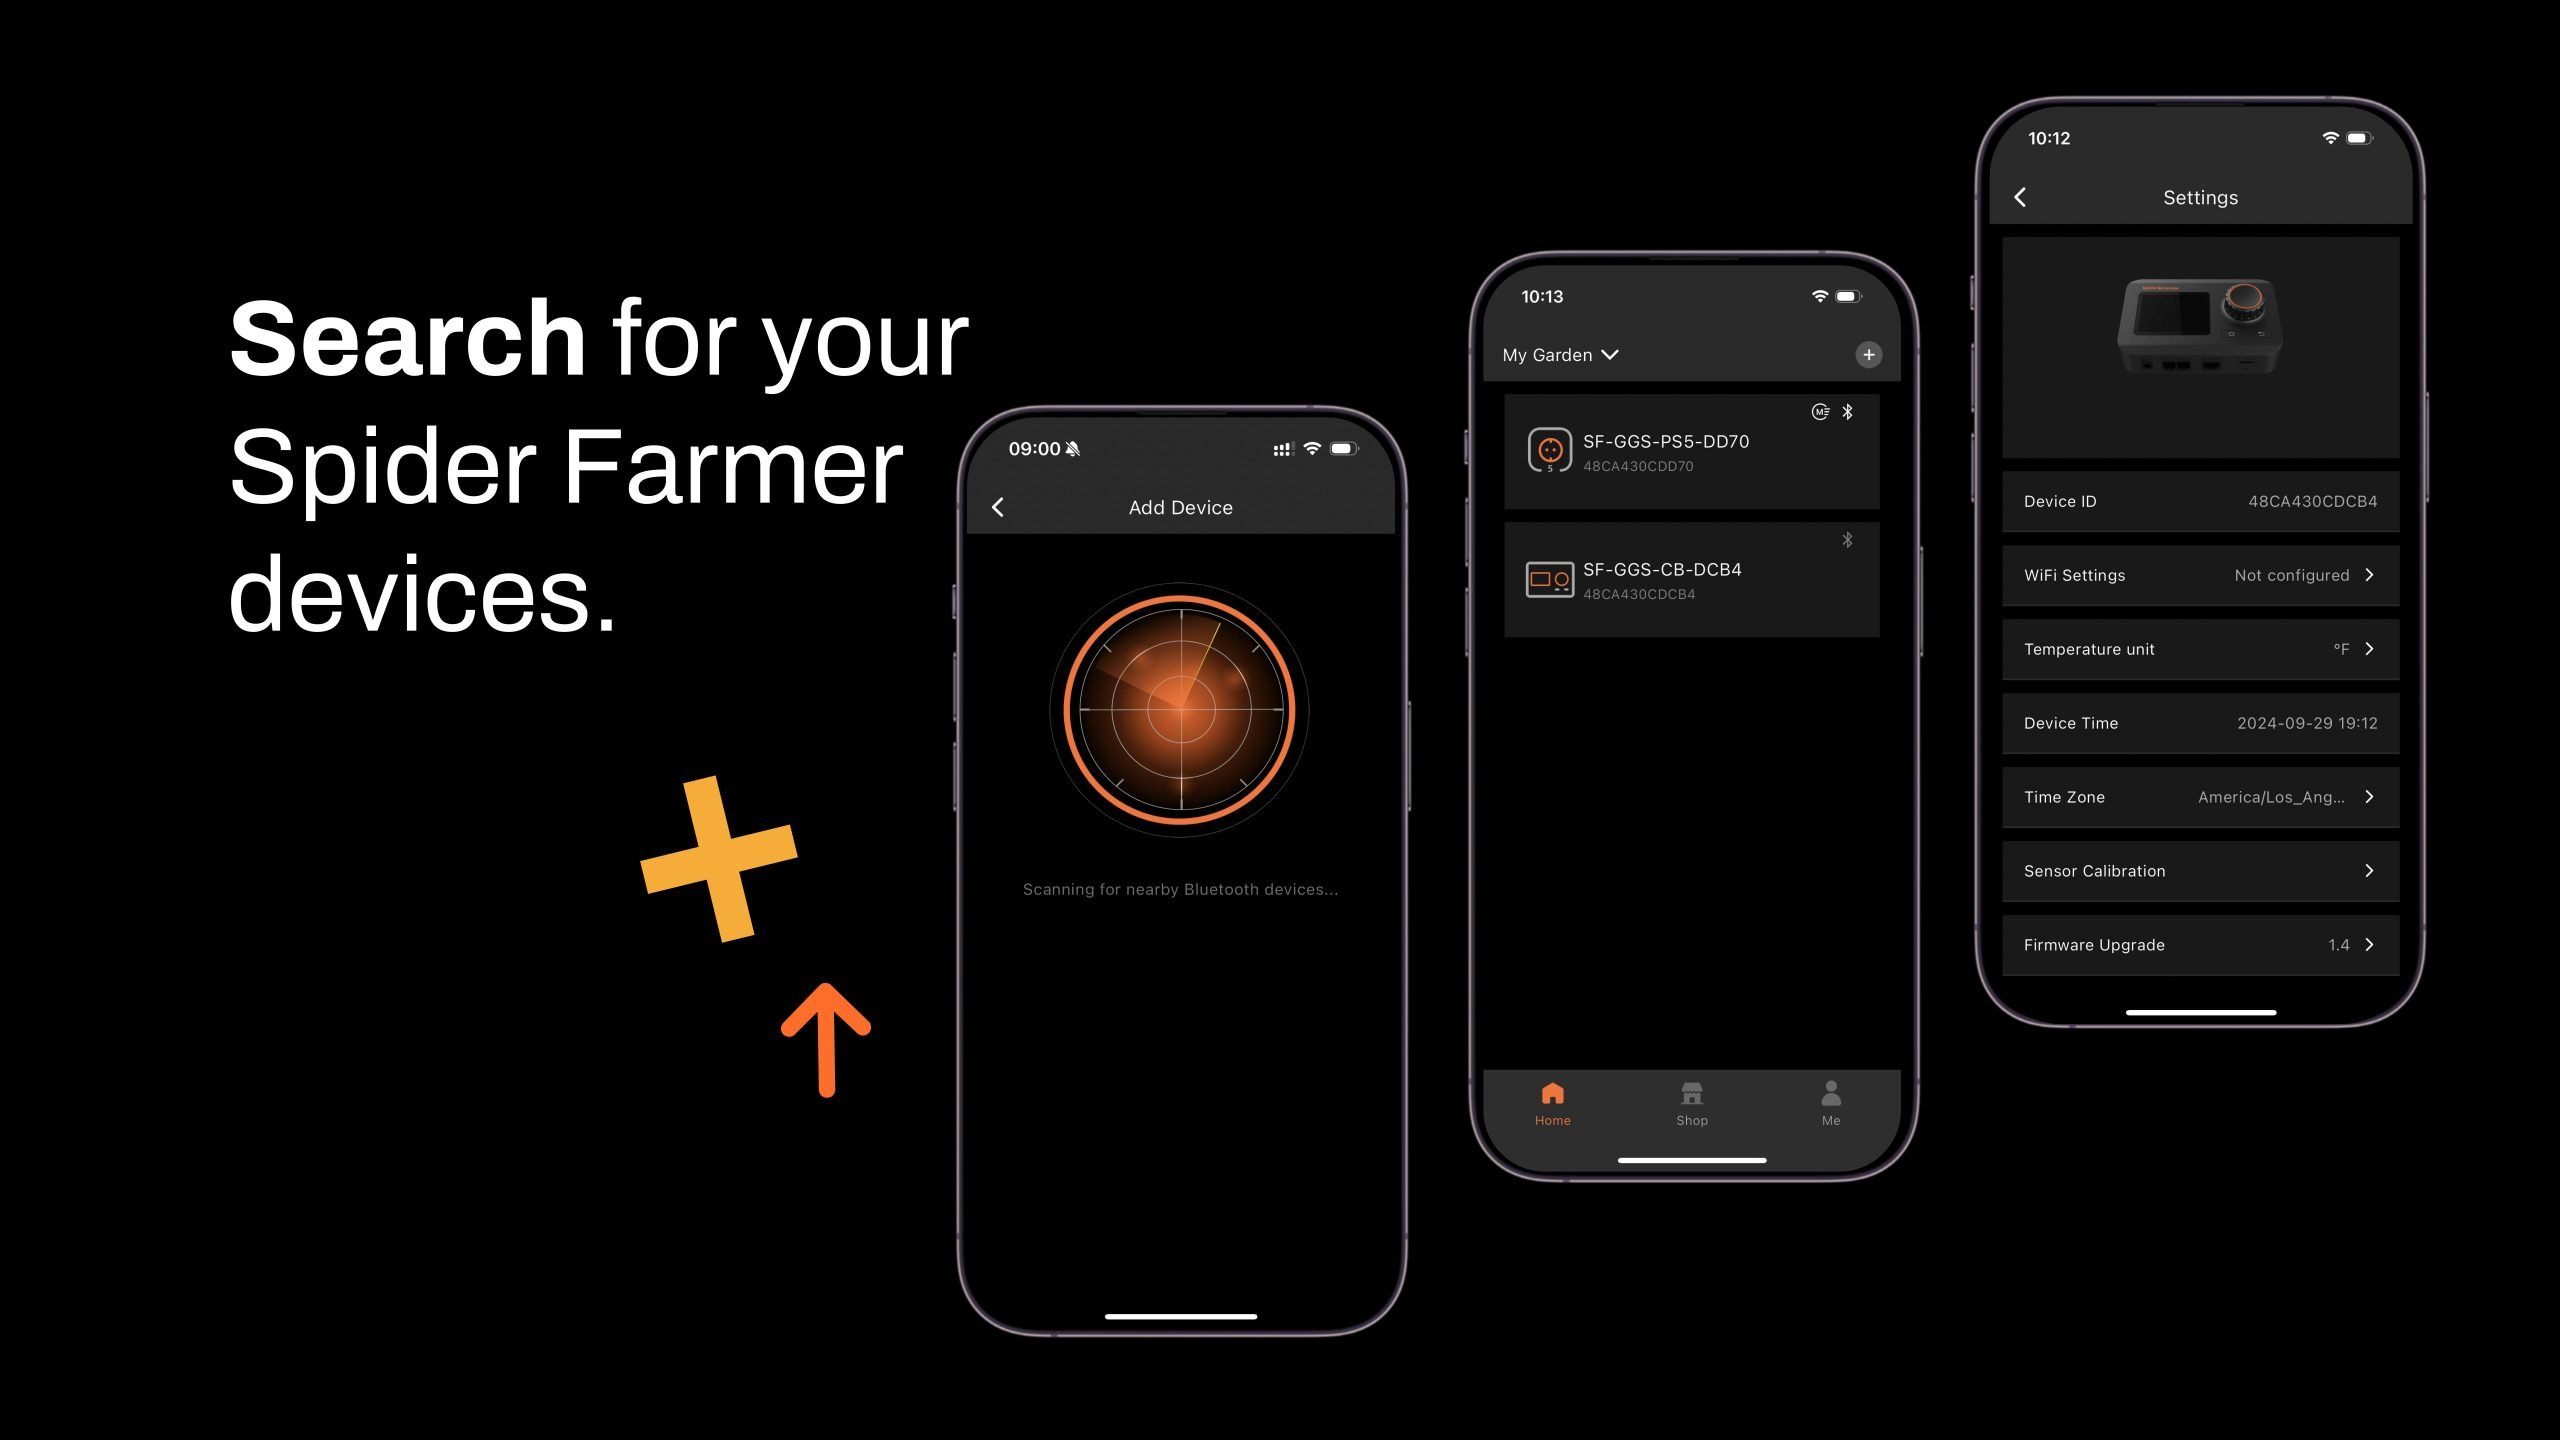
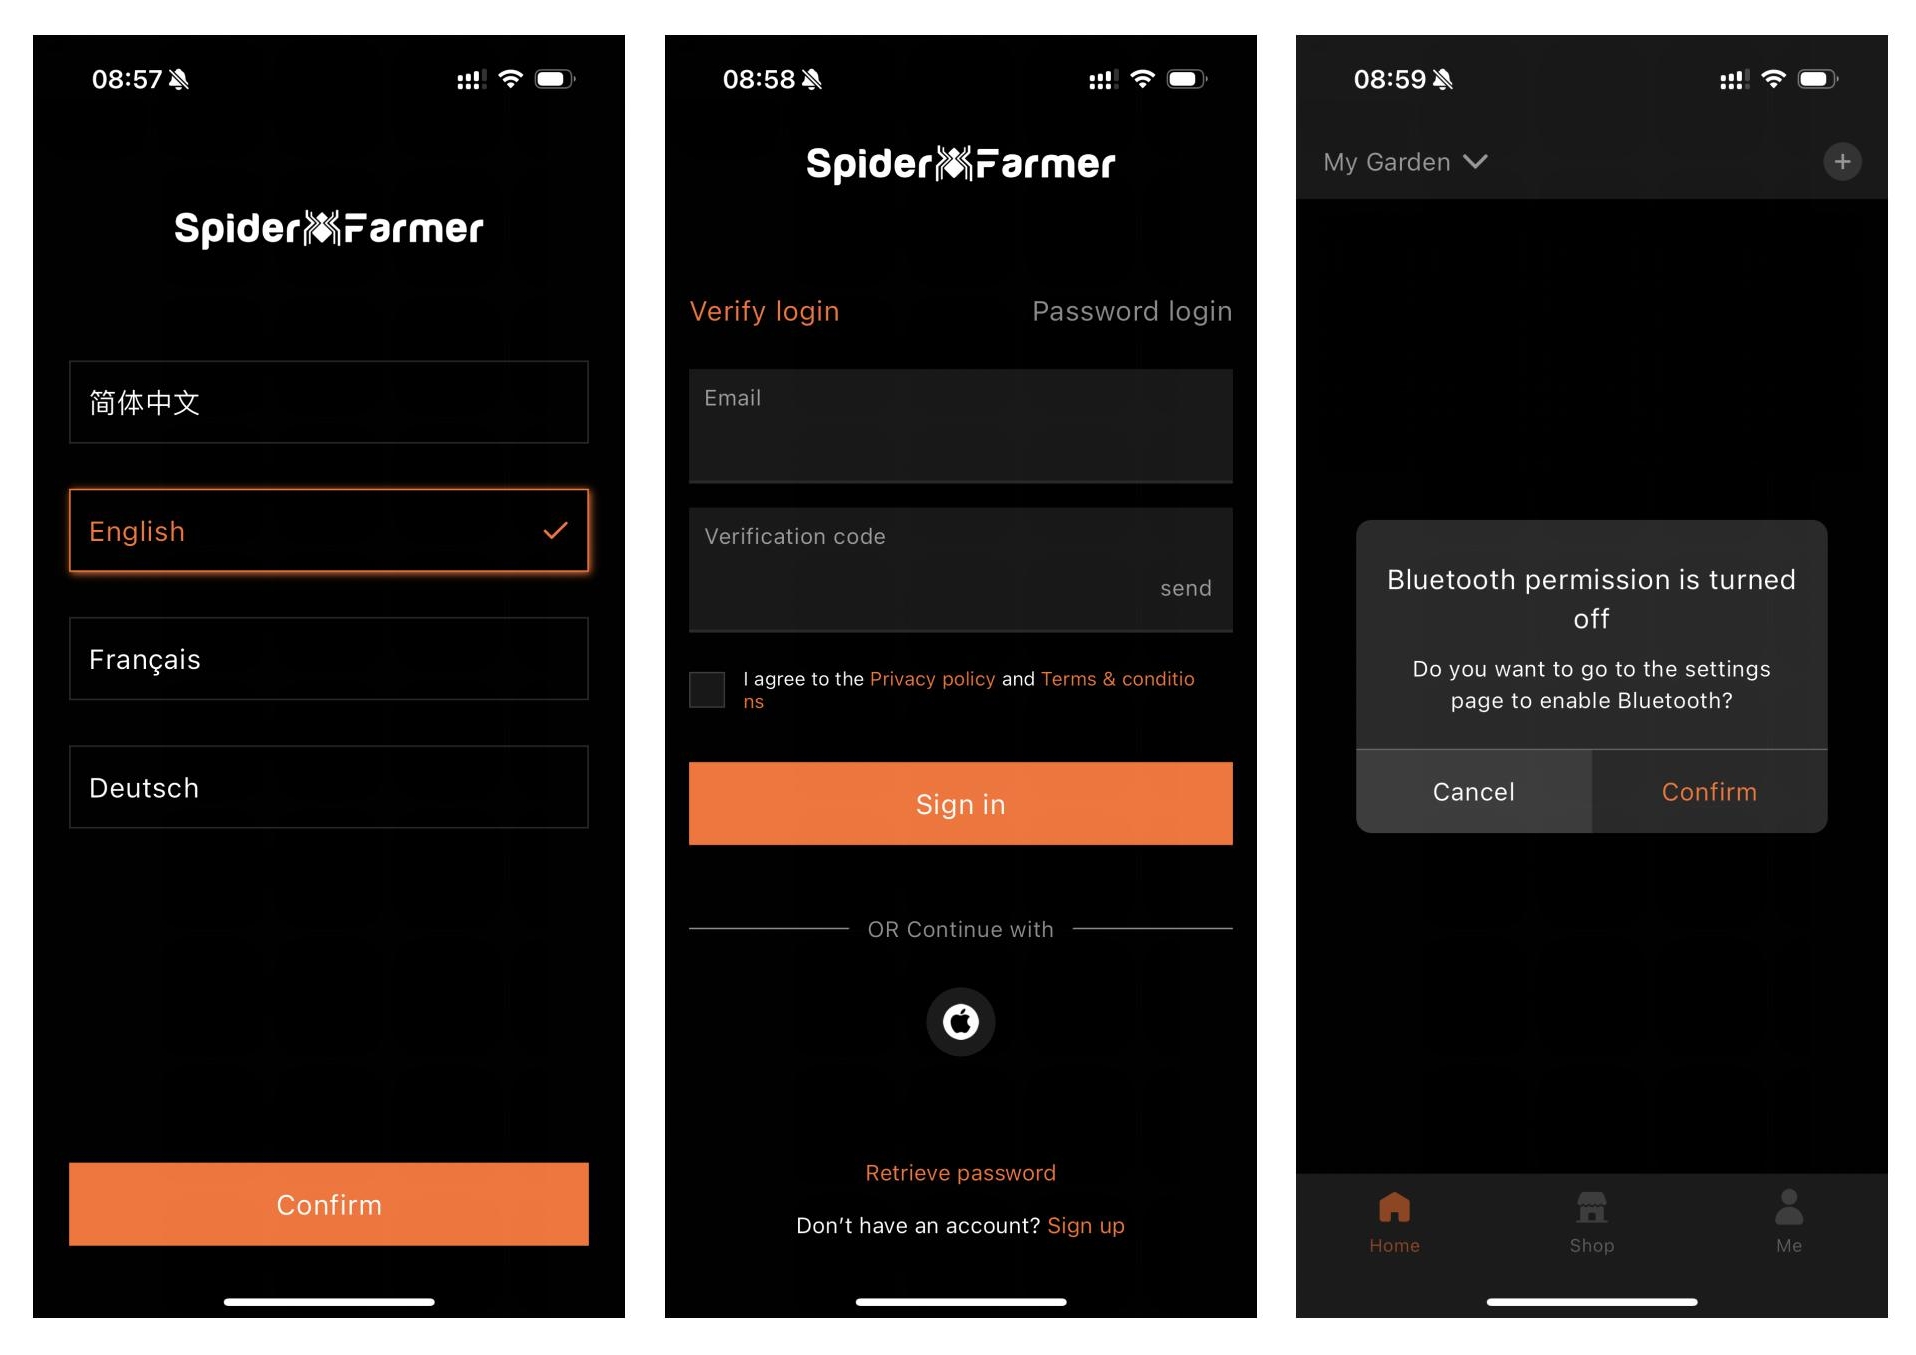
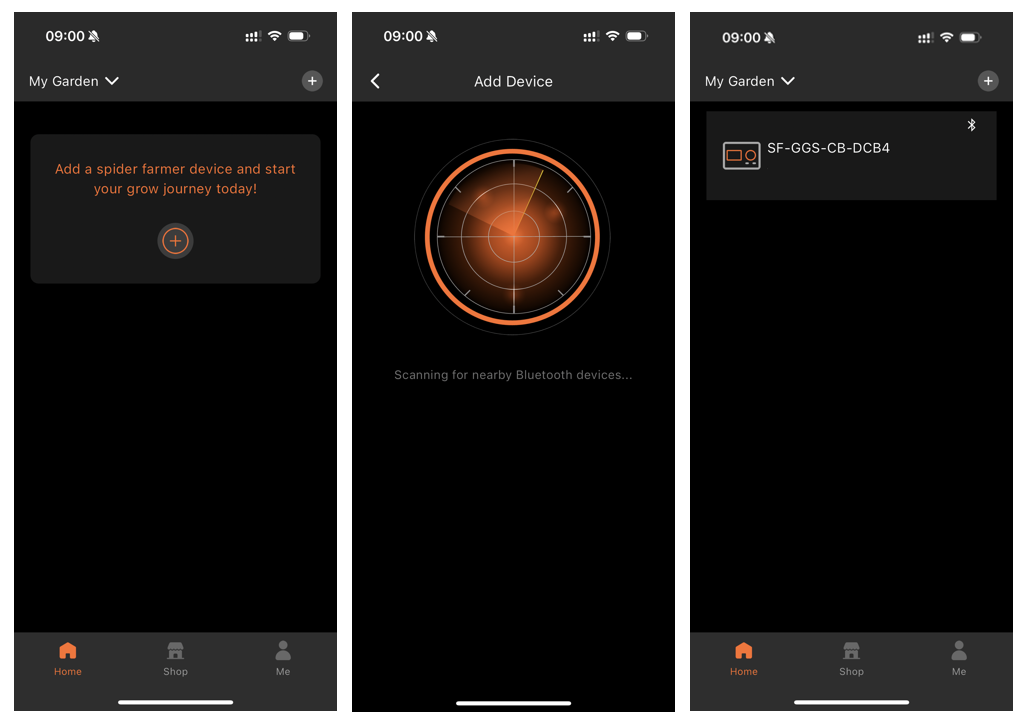
1. Download the Spider Farmer App

Search for 'Spider Farmer' on Google Play or the App Store, and download the app.

2. Language, Signup, and Bluetooth

Once you open the app, pick your language and sign up with your email. The app will then ask you to turn on Bluetooth.

3. Finding and Identifying Your Spider Farmer Devices

3.1 Starting Device Search

  • Tap the plus icon to begin searching for nearby Spider Farmer devices.
  • Detected devices will appear in the app, and you can identify them by their icons.

3.2 Troubleshooting Device Discovery

If you can't locate your device, try the following steps based on the device type:

  • If you have a Spider Farmer AC5/AC10 Power Strip: Press and hold the Ctrl button for 3 seconds to reset Bluetooth.
  • If you have an LED Grow Light with a Digital Display: Press and hold the knob for 3 seconds, then release to restore factory settings.
  • If you have a Spider Farmer GGS Controller: Select “Restore Factory Settings” from the interface.

Note: Restoring factory settings will delete all automation schedules and user connections.

3.3 Setting Up the SF-GGS-AC5 Kit

If you’ve purchased the SF-GGS-AC5 Kit, follow these steps:

  • Use the RJ12 cable to connect devices according to the provided diagram. (If you need to control the LED grow light, the GGS 2-in-1 adapter (included in this kit) is required. You’ll need to plug the light into the “light” port on the adapter.)
  • Ensure all devices are plugged into a power source, as the RJ12 cable does not provide power. The sensor only requires the RJ12 connection.
  • Open the app, search for your devices, and tap the Power Strip icon to start the setup.

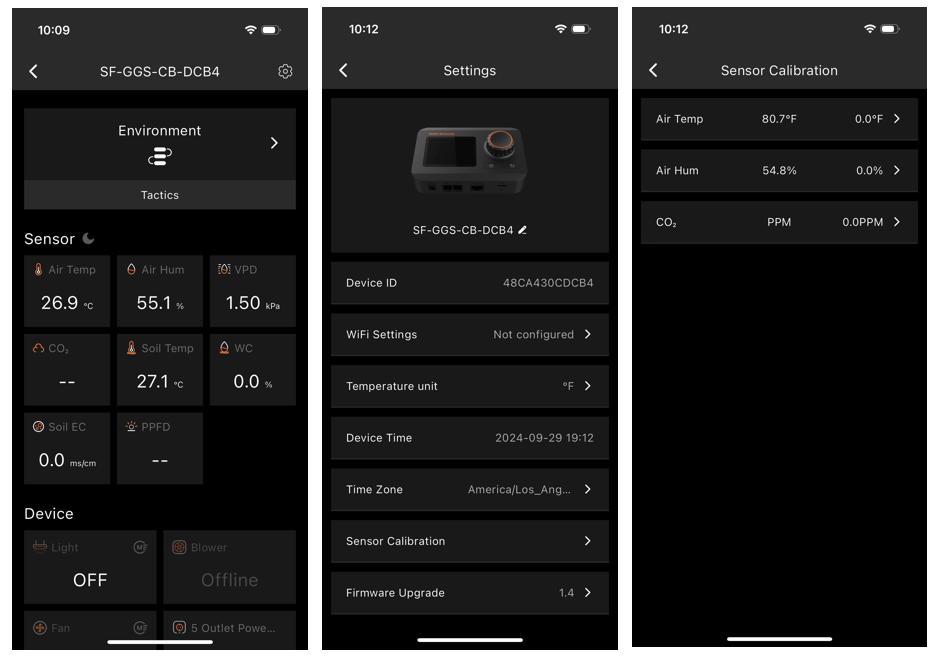
4. What Data Can You View on the Spider Farmer App?

  • 4.1 Time Display:

Quickly check the current date and time in your grow room with ease.

  • 4.2 Day/Night Icon:

See at a glance if your grow tent is in its light or dark cycle. A sun icon appears when light is detected, and a moon icon shows during dark periods. This feature allows you to monitor light conditions without opening the tent. (Requires the temperature, humidity, and light sensor included in this GGS AC5 Power Strip kit)

  • 4.3 VPD and Temperature/Humidity Display:

Get precise readings for temperature, humidity, and Vapor Pressure Deficit (VPD). (Requires the temperature, humidity, and light sensor included in this GGS AC5 Power Strip kit; Tip: Place the sensor at canopy level in the center of your growing area for the most accurate readings.)

  • 4.4 Soil Data Display:

Ideal for soil growers, this display shows real-time soil temperature, moisture, and Electrical Conductivity (EC). 

  • 4.5 CO₂ Display:

(This kit doesn't include the sensor required to measure that data. Please purchase the GGS Sensor Pro Kit separately.)

With an optional CO₂ sensor, you can directly monitor CO₂ levels, enabling you to optimize CO₂ concentration for faster growth. (Note: This sensor is sold separately and is not yet available in Europe—stay tuned.)

  • 4.6 PPFD Display:

(This kit doesn't include the sensor required to measure that data. Please purchase the GGS Sensor Pro Kit separately.)

  • 4.7 Sensor Placement Recommendations

5. Preparations Before Configuring Device Operations

  • 5.1 Environmental Conditions Settings

  • 5.1.1 Day/Night Cycle Optimization: Define the time range for day and night periods. The day starts from the day start time and ends at the night start time, while night starts from the night start time and ends at the day start time. If both start times are set the same, the system defaults to 24 hours of day mode.

  • 5.1.2 Environmental Conditions Settings: Set target values for temperature, humidity, and CO₂ levels for both day and night, along with the deadband range.
  • 5.1.3 Deadband Control: Maintain stability. For example, if the daytime temperature is set to 70°F with a deadband of 3°F, there is an upper and lower threshold. Cooling will activate at 73°F and stop once it reaches 70°F, while heating will activate at 67°F and stop at 70°F.
  • 5.2 Local Time Settings

  • Set your local time on the controller. This is necessary when setting operating times, such as for lights.
  • 5.3 Multi-Language Support

  • Our system offers multiple language options to ensure ease of use, including English, German, French, Spanish, Italian, and Chinese.

6. How to Control LED Grow Lights (G Series/ SE SeriesSF Series)

(Note: A GGS 2-in-1 Adapter is required to control LED grow lights through the GGS Power Strip. This adapter is included in the kit.)

6.1 Manually Adjust Brightness for Precise Light Control:

  • Set the brightness anywhere from 10% to 100%, giving you full control over light intensity at any time. For quick shut-off, setting the brightness to 0% will turn the lights off. Any setting between 0% and 10% automatically operates at 10% brightness.

6.2 Automate Your Lighting Schedule:

  • 6.2.1 Start and End Times: Easily set specific on and off times for your lights, so your plants get consistent light cycles without manual adjustments.
  • 6.2.2 Brightness Levels: Define the exact brightness level for each cycle, ensuring your plants receive optimal light intensity.

6.3 High-Temperature Protection for Your Plants and Equipment:

  • 6.3.1 Go Dark: Set a high-temperature threshold for dimming. When the ambient temperature reaches this threshold, the lights will automatically reduce brightness to 11% to prevent overheating.
  • 6.3.2 Turn Off: Set a higher temperature threshold for complete shutdown. When this threshold is reached, the lights will automatically turn off to protect your plants and equipment.

6.4 Sunrise/Sunset Simulation:

  • Activate this feature to simulate natural light changes, with the brightness gradually increasing at sunrise and gradually decreasing at sunset.

Example: If you set the light schedule from 8:00 AM to 8:00 PM with brightness at 100% and a 30-minute sunrise/sunset setting, the lights will gradually increase from 0% to 100% brightness between 8:00 AM and 8:30 AM. In the evening, starting at 7:30 PM, the brightness will gradually decrease from 100% until the lights turn off completely at 8:00 PM.

7. How to control inline fans, clip fans, and other equipment

Key Steps in the Process:

  • If your Inline Fan or Clip Fan does not have an RJ12 port (non-latest version), the GGS series can be compatible with these Clip Fans and Inline Fans without an RJ12 port. However, only the GGS Power Strip can be used. You can plug them into the GGS Power Strip and control them separately through the outlet section in the app. (At this time, the 'Fan (Clip Fan)' and 'Blower (Inline Fan)' options under the 'Device' section will be unavailable.)
  • If your Clip Fan or Inline Fan has an RJ12 port, it will be compatible with both the Spider Farmer GGS controller and the GGS Power Strip. You can manage your Clip Fan and Inline Fan through the 'Fan (Clip Fan)' and 'Blower (Inline Fan)' options in the 'Device' section of the controller.
  • How to check if your Clip Fan or Inline Fan has an RJ12 port? If you purchased the “Experience the Latest Features - Spider Farmer GGs Controller with Next-Gen Clip Fan & Inline Fan Kits,” both the Clip Fan and Inline Fan in the kit come with an RJ12 port. If you’ve purchased a Clip Fan from us before, simply check the body of the fan for an RJ12 port. If you’re buying the Clip Fan from our website, make sure to check the product description and images on the product page to confirm if it includes an RJ12 port. Currently, except for the kit mentioned above, all individually sold Inline Fans or Inline Fan kits do not come with an RJ12 port.

  • About using the GGS AC5 Power Strip or GGS AC10 Power Strip in combination with the GGS Controller:
  • Why Use the GGS AC5 Power Strip Along with the Controller?
  • For Those Who Prefer Traditional Control: The controller has physical buttons and knobs, making it easy for customers who prefer hands-on control without needing to rely on a smartphone. You can operate lights and the power strip just like traditional equipment, ensuring simple and reliable use.
  • Multi-User Control: The controller allows multiple users to operate the setup without each person needing their own smartphone. In a household setup, for example, anyone can quickly operate the controller, making it convenient and efficient.
  • Local Control: When the network is unstable, there’s a delay, or a phone isn’t convenient to use, the controller offers instant, local control. This option ensures smooth operation without relying on external connections.

7.1 Manual Mode vs. Auto Mode

  • Manual Mode: In this mode, you can manually turn each outlet on or off in real-time, giving you instant control over your devices.
  • Auto Mode: In Auto Mode, you can set up automated controls with time periods, time cycles, temperature control, humidity control, and CO2 control for each outlet.

7.2 Auto Mode Explained

  • Time Period Mode:Set specific on/off schedules for each outlet. Choose exact times for each day of the week or create recurring daily schedules. This allows you to provide consistent light, air circulation, or other resources precisely when your plants need them.
  • Time Cycle Mode: Set power cycles to control when your devices turn on and off throughout the day. For example, you could set a fan to run for 1 hour, turn off for another hour, and repeat the cycle as needed. This is ideal for managing airflow, lighting intervals, or other timed needs in your grow room.

  • Temperature Mode:Control devices based on temperature. For example, if you plug a Clip Fan into an outlet set to Temperature Mode and specify it as a cooling device, the fan will automatically turn on when the temperature exceeds your target—keeping the environment stable without manual adjustments.

  • Humidity Mode:Easily manage humidity levels. If you connect a humidifier, set the outlet to Humidity Mode, and specify it as a humidifying device, the outlet will power on to increase humidity when levels drop below your desired range. This way, you can maintain optimal humidity for your plants without constant monitoring.

  • CO₂ Mode:Manage CO₂ levels by connecting a CO₂ device. Set the outlet to CO₂ Mode and specify whether it should add or vent CO₂. The outlet will activate based on your target CO₂ levels, giving you precise control over your grow room environment.

7.3 Important Note for Inline Fans with Digital Temp/Humidity Controller

  • When using an Inline Fan with a digital temperature and humidity controller, do not use the fan’s built-in sensor. Instead, use the temperature, humidity, and light sensors that come with the GGS AC5 Kit to control your device automatically.


Customer Reviews

Be the first to write a review
0%
(0)
0%
(0)
0%
(0)
0%
(0)
0%
(0)